Break/Fix
Repair guides for common error messages, problems we have seen before, or obscure fixes that need to be documented before Microsoft reformats their knowledgebases and deletes all the old articles... again.
Adobe
License Migration
If you are attempting this process on a terminal server and it fails, then an administrator will need to employ this supplementary guide.
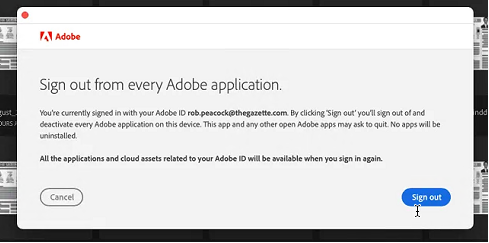
If you are currently logged into Adobe, you simply sign out of your account and sign back in. Again, this will occur on or after August 7th and an email will be sent that morning the work has been completed.
Please note: Depending on the application you are using the sign-out process may be slightly different.
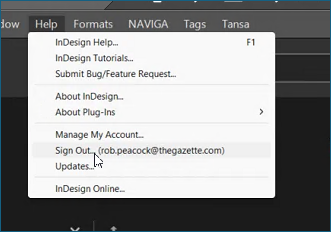
Choose Sign out if asked.
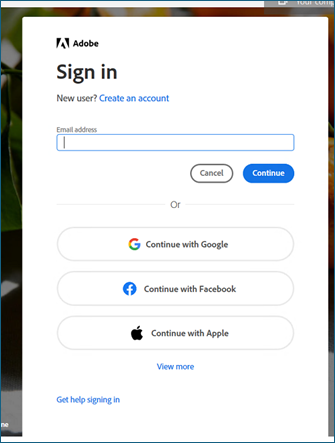
Enter your Adobe username as normal.
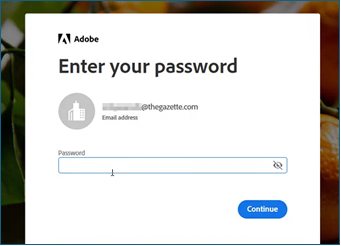
Enter your Adobe password as normal.
You should get prompted to join the new Team, click Join team of “Local Media – Gazette”

Select “Local Media – Gazette” to use the new license within the new Team.

Stock Account Users (FYI)
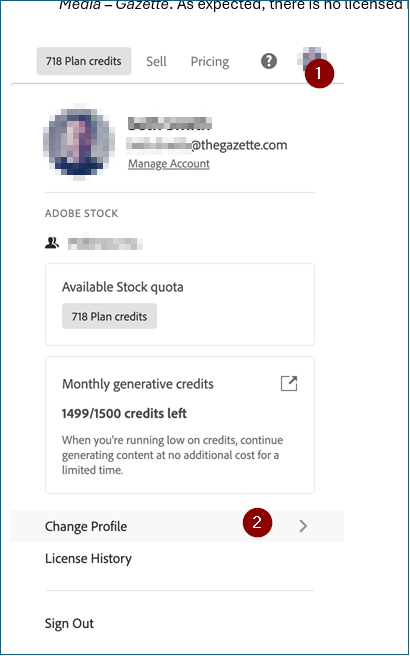
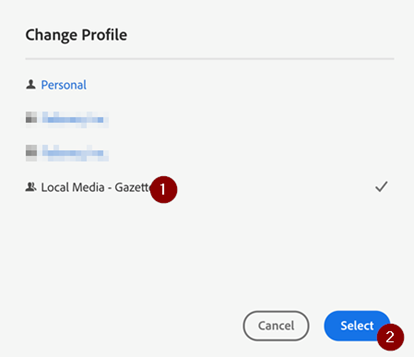
If you use https://stock.adobe.com for Stock photos, you may need to manually change your account by clicking your profile image at the top and then choosing “Change Profile”. As previously noted, there will be no licensed image history in the new account.
Cloud Libraries (FYI)
For anyone using cloud libraries, you may want to keep this link handy for exporting these from your old account and then importing them into your new account. It may behoove you to export ahead of August 7th to avoid going back and forth between accounts to save steps. You will still have access to items until September 1st, but something to note if you use this functionality.
https://helpx.adobe.com/creative-cloud/help/import-export-creative-cloud-libraries.html
License Migration on Terminal Servers
The steps for the Adobe License Migration are sometimes successful on a terminal server without incident. But, they may instead produce an error message that the subscription status cannot be verified:
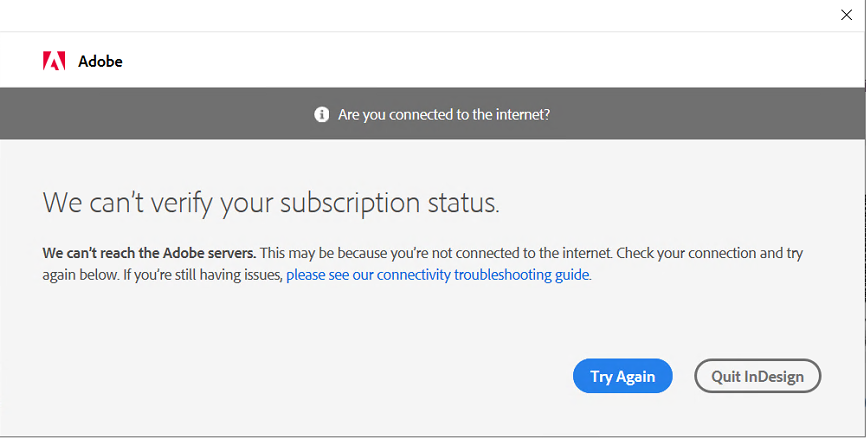
In these cases, Adobe's recommendation is to disable "Acrobat Protected Mode". This change is made in the HKEY Current User registry hive, meaning it is per user, not per computer, so the same change may need to be made for multiple users of the same terminal server. These are the steps.
- Quit all Adobe software.
- Double click AdobeAcrobat_PMOff.reg as the user to copy the values in the file to the user's registry hive.
- Run the Adobe software, and verify successful login.
- Double click AdobeAcrobat_PMOn.reg as the user to re-enable Acrobat Protected Mode for their userstate. Now that the license is verified, this should not be necessary a second time unless the license changes again.
Crowdstrike
Channel File 291 Bootloop
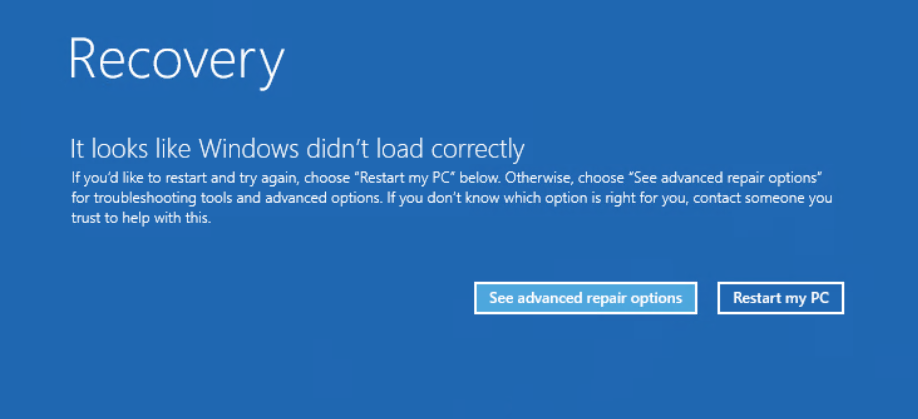
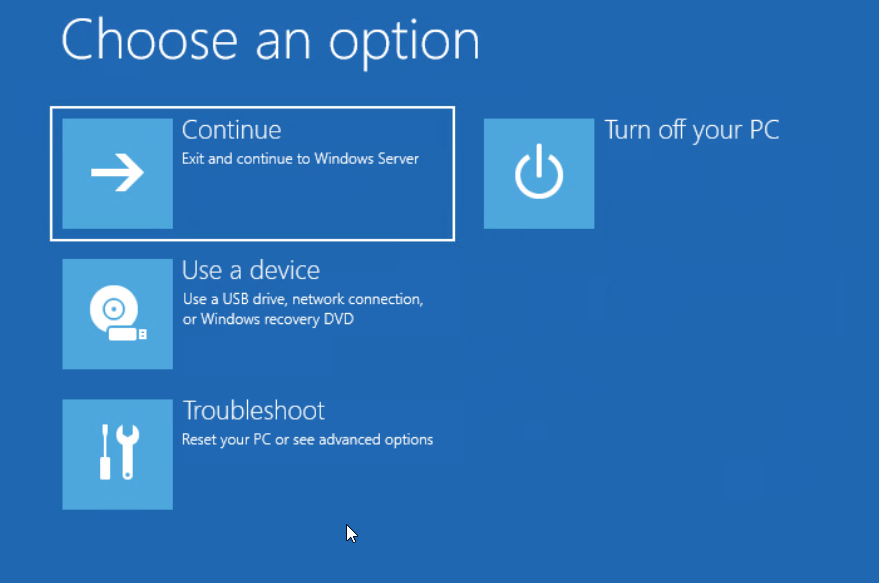
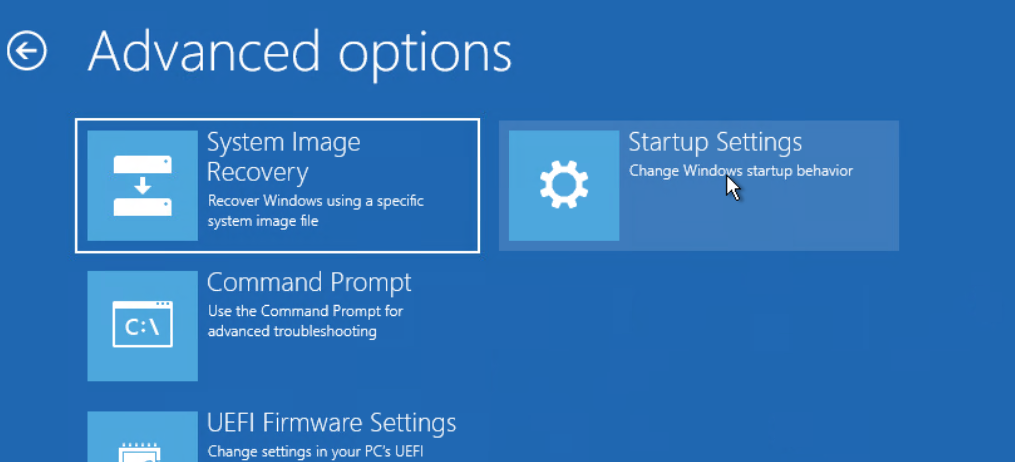
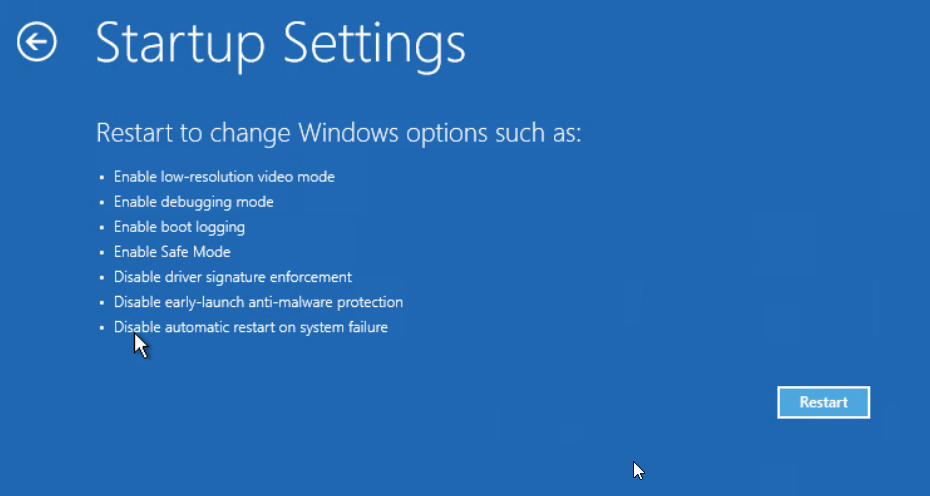
To reboot a machine into safe mode (workstation or server) follow these steps..
At the recovery screen hit "see advanced.."
Troubleshoot
Advanced Options
Startup Settings
Hit reboot
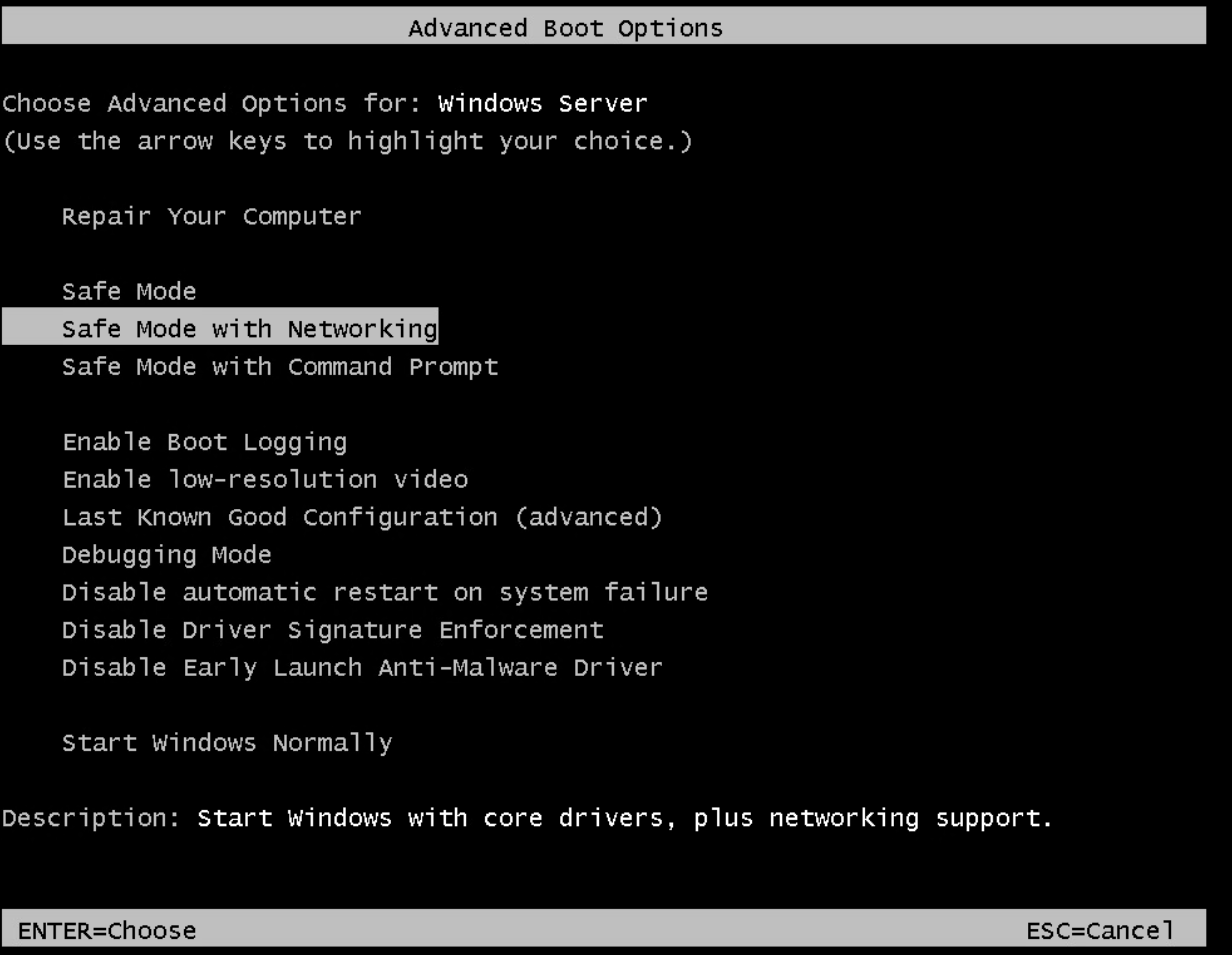
Once the server reboots you'll see this recovery option screen. I've been selecting "safe mode with networking" since there's a chance you'll still be able to auth using your normal elevated creds (if not cached).
Once you've logged into the server you need to open up cmd or powershell.
C:\Windows\System32\drivers\CrowdStrikedir (to list all files)
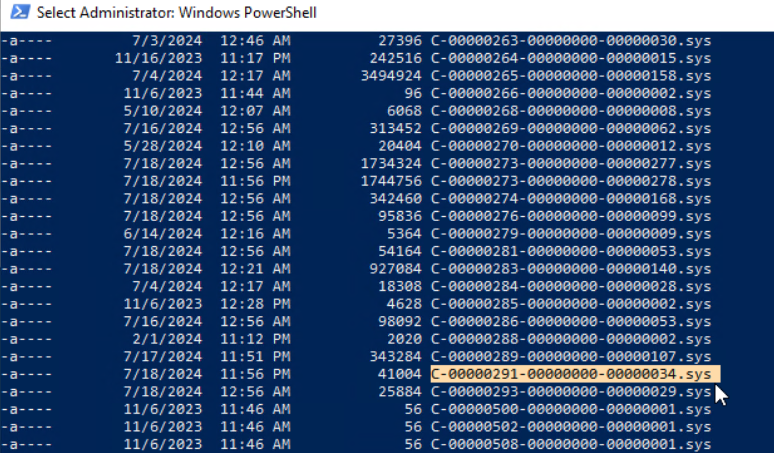
Copy this filename ( C-00000291-etc) and then run this:
del <filename you copied>Reboot the machine.
Procedures for Machines Requiring Added Storage Drivers
Machines like the ProBook 650 G8 may not have the "Startup Settings" option above. Instead, follow these steps.
- Load the correct driver for the machine to an external drive.
- Use the Command Prompt option in the recovery mode which will open a command prompt into the Windows Recovery Environment, mapped as X:\
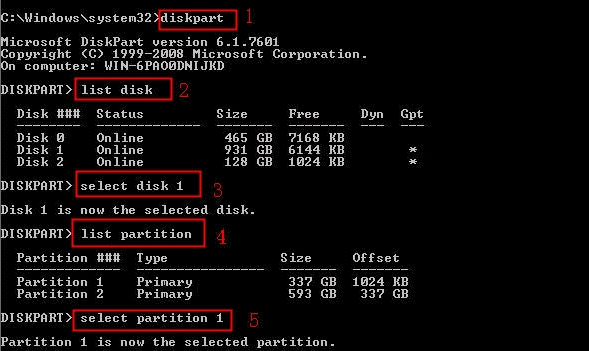
- Type DISKPART to enter disk partition mode.
This screenshot is for illustrative purposes only. Your disk and partition numbers will vary.

- Type List Disk and identify the disk number, based on its size, that contains the driver
- Type Select Disk # based on the size and hit enter - the selected disk is now active
- Type List Partition and identify the primary partition
- Type Select Partition # and hit enter - the selected partition is now active
- Type assign letter=[drive letter] where drive letter is any available drive letter (at this point, any except x)
- Type EXIT to leave disk partitioning mode
- Change drive letter to the drive letter you just assigned.
- Change directories to the directory containing the .inf file for the storage driver - in the example included and attached to this document, that is the *:\src\driver\ directory but this may be different for other drivers.
- Type pnputil -i -a drivername.inf to load the driver into active memory.
- Repeat steps 3 through 9 above, but this time select the new, larger drive that you should now be able to see. Select its primary partition and mount it to a different drive letter than the one you chose in step 8.
- Once out of disk partitioning mode again, select your new drive letter.
- Change directory to *:\Windows\System32\drivers\CrowdStrike
- Rename any files beginning with "C-00000291" to end with ".old" instead of ".sys" and then restart the system.
- You're done!
Printers
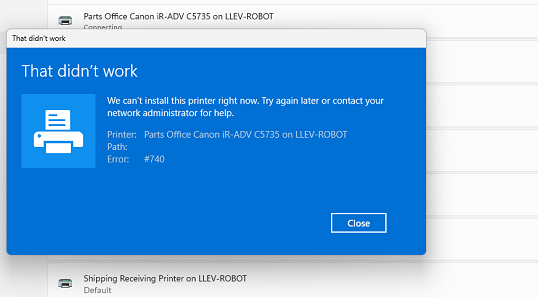
Printers Need Driver Or Fail To Install
After installing software meant to enable cross-tenant cloud printing, which monopolized the print queues on the print server, re-establishing the relationship with the printers was necessary on some devices at LLEV.
- Open Settings and navigate to Bluetooth & Devices > Printers & scanners
- For any printer that says "New driver required" click the printer and then click "Remove"
- Open terminal - as the user works just fine
- Do a gpupdate: gpupdate /force
- When the printers are re-added from the print server, they work properly again
Additional Issues
If you see any of the following errors...

- Error 0x80070bcb during a gpresult/h
...this can be overcome by adding the printer as an admin. Open a terminal as admin and run this command:
rundll32 printui.dll,PrintUIEntry /il
This allows the printer to be installed as an admin, which downloads the driver. After this, the printer can be removed and a gpupdate run again to install the printer properly.